Before we start billing insurance claims, we will begin by establishing some structure and providing a few guidelines on how it works. We will place procedures under separate categories to understand how they are processed differently. Afterwards, we will go through processing the payment and how to follow up on delayed or denied claims.
Creating the claim #
Once a patient has received diagnosis and/or treatment, you will receive the patient’s chart with the treatment that the patient received. Depending on what the treatment and diagnosis is, you will need to get the procedure pre-authorized or you can bill it immediately. There are also procedures that are not covered by Medical so these would be paid out of pocket by the patient if the patient requested these services.
The following list provides a detailed breakdown of how to categorize each procedure:
Adult procedures that require pre-authorization: #
- Partial and full dentures
- Root canal treatments
- Crowns
- Root canal re-treatments
- Scalar and Root Planing (SRP)
Adult procedures that do not require pre-authorization: #
- Diagnostic – including office visits, exams, x-rays
- Preventive – including cleaning, prophy, sealants, fluoride
- Adjunctive services
- Palliative treatment – pain medication, extractions to treat pain
- Occlusal adjustments
- Restorative – composite fillings (only for cavities), crown buildup, post & pins
- Endodontics – pulpal debridement (Open and Med)
- Prosthodontics – immediate dentures, denture adjustments, relines, other repairs.
- Oral surgery – any extractions
Adult non-covered procedures: #
- Composite fillings due to abrasion (wear and tear)
- Orthodontics
- Irrigation
- Antibiotics application
- Implants
- Bridges
Children procedures that do not require pre-authorization: #
- Root canal treatment
- Pulpotomy
Children procedures that need pre-authorization: #
- Crowns
- Root canal re-treatment
Preparing procedures for billing #
Here are the following steps to prepare a claim for billing:
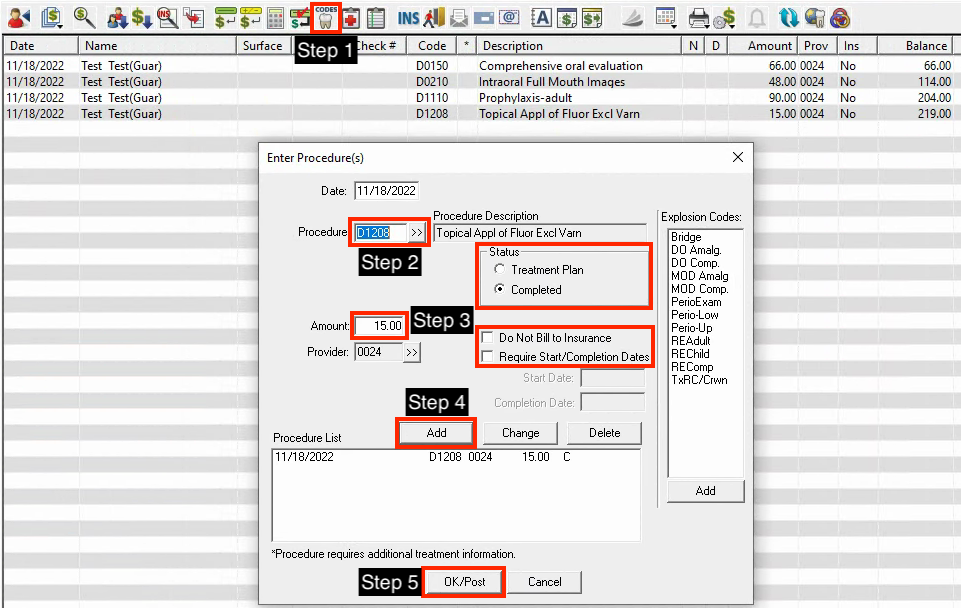
- Go to the accounts module and click on the enter procedure button.
- Go to Procedure and look up the ADA dental code by clicking the double arrows or manually input the code in the field.
- Make any necessary adjustments to the amount, check the box if it does not need to be billed to insurance, and indicate whether it is a treatment plan or if it was completed in the status area.
- Once you select or input the code, click Add and it will be added into the procedure list.
- Click OK/Post and you will see your procedures listed on the accounts page.
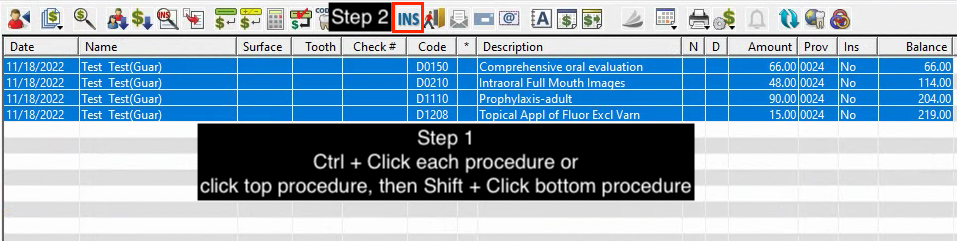
This specific set of dental codes is diagnostic and preventive which do not need any pre-authorization. Therefore, we are clear to move on to the next step, which is to select all procedures and create a claim.
Here are the following steps to create a claim:
- Select all procedures you are going to bill by clicking on the highest or lowest procedure on the list. Hold down the Shift key on your keyboard and click to the other end of the procedures to select all. Alternatively, you can hold down the Ctrl key on your keyboard and click each procedure until you highlight all of the procedures for the claim.
- Click on the Create Insurance Claim button.
- Once you have successfully created the claim, you will see this window pop up. You will also see a new account entry that says Dental Claim – Created with the total billable amount of the claim.
This is what you should see when you successfully create the claim. Note that you can see a new line entry that says Dental Claim – Created 219.00. The amount is the total balance for the set of procedures performed on that date.
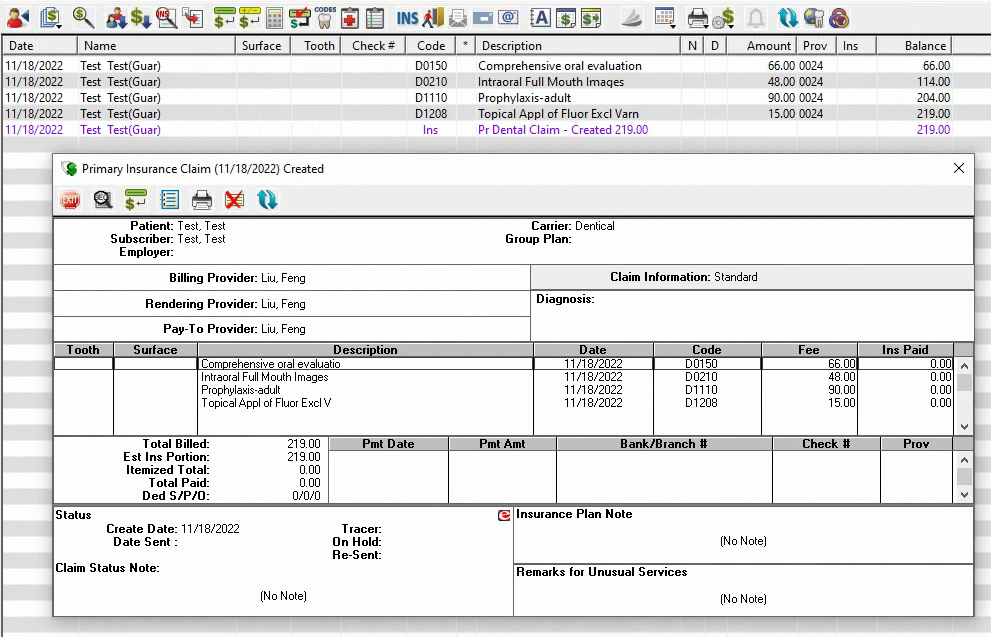
*Please talk to your manager to ensure the billing provider, rendering pay to are all correct. *
Remote Lite by Vyne Dental #
Now that we have created a claim, we can digitally print it to Remote Lite. Remote Lite is an online billing platform where you can manage and submit your insurance claims. You can track the progress of claims, receive digital documents, add attachments and more through the Remote Lite platform.
Now that we are ready to get familiar with the Remote Lite platform, let’s print the claim we just created and send it to Remote Lite. To do this, click on the print button and click on print. During this step, you should see a black window pop up and some data transmission activity.
*please make sure that the printer is set to RES to RES on the printer setup settings.*
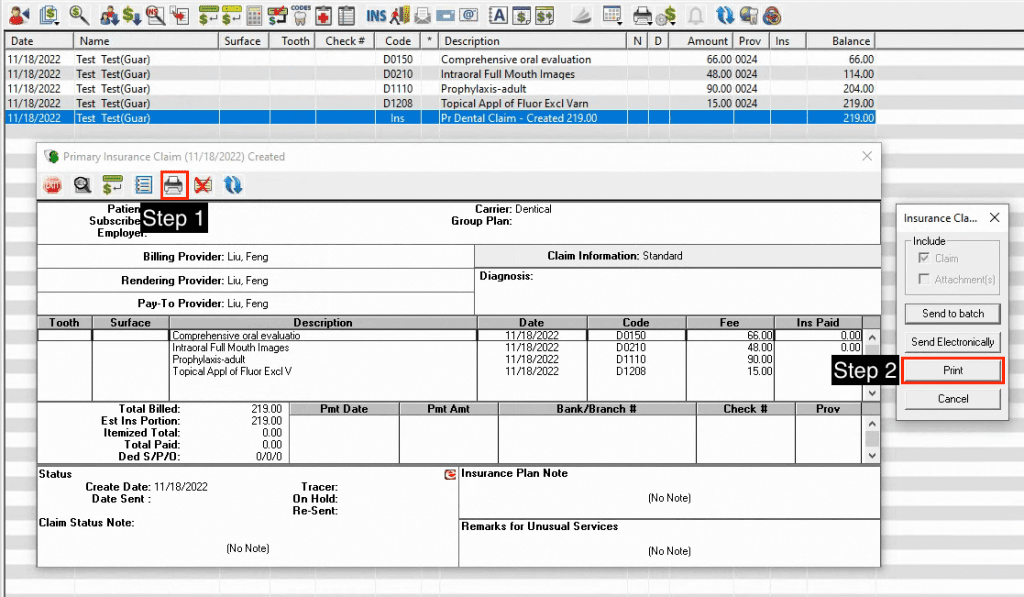
If you see your printer printing paper documents, please cancel the print and change the print settings.
if they are already authorized and performed, or if they dont need preauthorization select and submit for billing through remote lite
verify all procedures are included in the claim. sometimes if the claim is too long, it gets cut off into two parts. Please confirm for these claims that you have attached all the relevant attachments.
make sure to add all xrays and images needed for each procedure. make sure to do the same for the second part of the claim.
RECEIPT
When you succesfully submit the claim for Medical, the claim should take up to 2-3 weeks to process and receive a response within this period. Usually if everything was submitted correctly, the payment should arrive via paper mail in the form of a check and payouts can be verified by the EOB, Explanation of Benefits, which you will also receive by paper mail. If you are able to verify that you received full payout on all procedures, you can consider the claims process complete. Occasionally, you will receive a partial or reduced payout for procedures because they were denied or downgraded. In this case, notify your manager and find a resolution whether to resubmit the claim with relevant information with CIF forms or get approval to write-off any remaining balance.
Pre-Authorized Claims #
Pre-authorized claims involve a few more steps and follow up compared to other claims, so it is important to track these claims regularly.
You will receive a physical printout by mail with a list of procedures that were authorized to be performed by a certain date. Here is a sample of what the NOA (Notice of Authorization) looks like:
*show screenshots of where to find NOA from remote lite > dentical inbox ** replace this image with that NOA.
physically print out the page
show how to fill it out
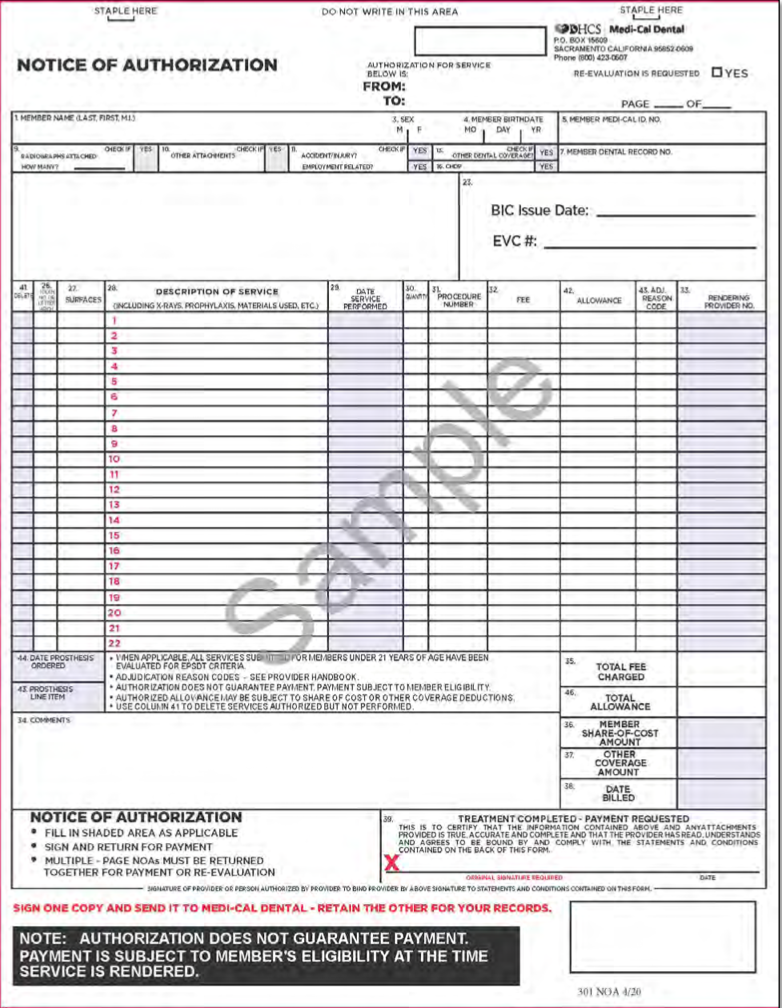
Often times, the patient will not have all of the listed procedures performed on the same day. For example, if Medical authorized the patient to receive four SRP’s (Scaling and Root Planing), RCT’s (Root Canal Treatment), and crowns after the RCT’s, you can see how this requires multiple visits. All pre-authorized treatments must be completed within a six month window. If the patient fails to receive treatment within that time or we fail to submit the completed procedures in a timely manner, we will not be paid for our rendered services. This is why it is so critical to be on top of all NOA’s and submit them as soon as possible.
Once you submit the NOA, there will be a turnaround time for Medical to process the claim. You can check the progress of the claim payment by going to the Medical Dental website and looking up the patient or regularly checking the EOB’s (Explanation of Benefits) that arrive in your office for Medical payouts.


